There are 2 steps need to be followed to create concurrent programs. 1)Creation of concurrent Executables 2) Creation of concurrent programs.
Lets discuss the steps to create concurrent program using simple database procedure to display output in text format.
1) Create a simple procedure which displays order information.
To copy select+ctrl+C
2) Go to Application Developer/System Administrator Responsibility =>Concurrent=>Executable
Concurrent program executable window will be opened.
3) Enter the Executable Name.
4) Enter the Executable Short Name.
5) Select the Application from LOV.
6) Enter the description of the Concurrent executable.
7) Select the Execution Method. As it is a Procedure need to select PL/SQL Stored Procedure.
8) Enter the Execution File Name i.e the procedure name.
9) Click on Save.
10) Go to Concurrent=> Program
Concurrent Program window will be opened.
11) Enter the Program Name. This is the user concurrent Program name.
12) Enter the Short name. This name should be same as the Executable Short name.
13) Select the Application from LOV.
14) Enter the description of concurrent program. It is optional.
15) Select the Executable name from the LOV.
16) Select the Output format. There are many formats available as html, XML, Text. In this case it is Test.
17) Click on Save.
18) Find out the request group attached to the responsibility where you would like to attach the concurrent Program.
19) Go to System Administrator Responsibility=>Security=>Responsibility=>Request
20) Query with the Request Group Name.
21) Go to Detail Block and add the Concurrent Program name to the Request Group.
22) Go to the Responsibility where the concurrent Program is available.
23) GO to View Menu=>Request. Select Submit new Request
24) Submit Request Window will be appeared. Select the Concurrent Program from the LOV and Click on Submit.
25) Once it is Completed click on view log to view the log details
26) Click on the output button to view the output. Below screen shot is the expected output.
27) As explained above is the program without any parameter (the date is hardcoded in the procedure). You can also pass the parameter from the concurrent program.
28) Click on the parameter button on the concurrent program window.
29) Create the parameter name, Select the value set name and click on save.
30) Modify the database procedure with the parameter as from_date and to_date. Use this in the query.
31) Once you submit the concurrent Program It will ask for the Parameter to enter.
32) Use the below query to get the data about concurrent program from the backend.
1) Query to Find the concurrent execution file name
2) Query to find concurrent request details. (Once you submit the request you can get request_id . Using that you can trace further)
Hope you like this...!!! If you have any concern/doubt please comment/contact us.
What is value set?
Value set is the list of values with validations. In other words it is the container of values. This value sets are mainly used in Parameters of concurrent programs and also in Flex field.
Types of Value sets:
There are 8 types of value sets.
1) None:
This value set allows user to enter the values, but it should meet the value set formatting rule. Eg. The values entered should not exceed the maximum limit you mentioned in the value set.
2) Independent:
Independent value set provides the list of predefined values to select. These values may have associated descriptions.
3) Dependent:
A dependent value set is similar to an independent value set, except that the available values in the list and the meaning of a given value depend on which independent value was selected in a prior segment of the flexfield structure.
4)Table :
Table Type value sets are the value sets which provides the list of values from the application table. You can use the even custom tables but those tables should be registered in Apps. If it is not registered those tables will not show in the list of tables.
5) Special:
Special value sets provide a mechanism to allow a "flexfield-within-a-flexfield". These value sets are primarily used for Standard Request Submission parameters. You do not generally use these value sets for normal flexfield segments. Special value sets use special validation routines you define.
6) Pair:
Pair value sets provide a mechanism to allow a "flexfield-within-a-flexfield". These value sets are primarily used for Standard Request Submission parameters. You do not generally use these value sets for normal flexfield segments. For example, you can define validation routines to provide another flexfield as a value set for a single segment or to provide a range flexfield as a value set for a pair of segments.
7) Translatable Independent:
A Translatable Independent value set is similar to Independent value set in that it provides a predefined list of values for a segment. However, a translated value can be used.
8) Translatable dependent:
A Translatable Dependent value set is similar to Dependent value set in that the available values in the list and the meaning of a given value depend on which independent value was selected in a prior segment of the flexfield structure. However, a translated value can be used.
Let us discuss the creation of value sets.
Steps to create Table Type value set:
1) Go to Application Developer Responsibility=>Application=>Validation=>Set
Value sets window will be opened.
2) Enter the value set name.
3) Enter the description of the value set.
4) Select the List Type and Security Type.
5) Select the Format Type and Enter the Maximum size. You can also select the format like Number Only or upper case only check box. It is optional.
6) If required you can enter Min value and Max Value. It is optional.
7) Select the Validation Type as Table and click on Edit information.
Validation table information window will be opened.
8) Select the Application name.
9) Select the Table name from the List of values.
Note: 1) You can also select multiple tables in the Table name field. To do so write your query and paste that query in table name field using ( ) and give the alias name.
2) If you would like to use the values of any Value set in Where clause you can use :$FLEX$.value_set_name
10) Select the value and meaning. This shows in the list of values.
11) Select the ID which is the actual value used.
12) If there is any Where Clause or Order By Clause write that in Where/Order By field.
13) Click on Test button to validate your value set.
Steps to Create Independent Value Sets:
1)Step 1-Sep 6 are same as in Steps to Create Table Type Value set.
2) Select the Validation Type as Independent.
3) Go to Application=>Validation=>Values
4) Enter the Name of the value set and Click on Find.
5) Enter the value, Translated value and Description of that value.
The values entered here will be listed in LOV.
Steps to Create Dependent Value set:
1) Step 1-Sep 6 are same as in Steps to Create Table Type Value set.
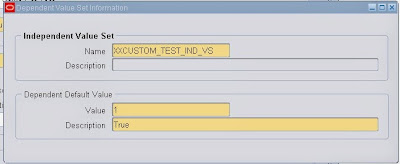
2) Select the validation Type as Dependent and click on Edit Information.
3) Select the Name of the value set from the LOV.
4) Enter the Dependent Default value and Description. Click on Save
>
5) Go to Application=>Validation=>Values
6) Find the Dependent Value set
7) Enter the Value, Translated Value and Description.
Steps to use Value set in Concurrent Program As parameter.
1) Open/Create a concurrent Program. Click on Parameters
2) Enter the Sequence and provide the name to the Parameter.
3) Select the Value sets you would like to use.
4) If you Run the request . It will ask for the parameter.
5) Note that Dependent value set is disabled as the Independent Value set is not yet selected.
6) Once the Independent value set is selected, Dependent Value set is enabled and allows to select the values.
Responsibility is a set of menus,sub menus,form functions and request group.
Follow the below steps to create responsibility.
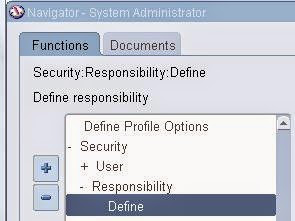
1) Go to System Administrator =>Security =>Responsibility =>Define
Responsibilities window will be appeared.
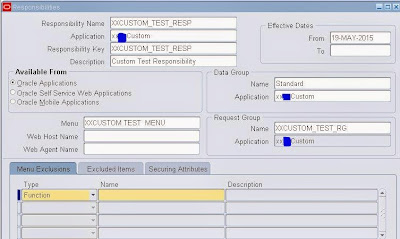
2) Enter the Responsibility Name.
3) Select the application from the LOV.
4) Enter the Responsibility Key.
5) Enter the description for the responsibility.
6) You can also mention the effective date for the responsibility.
7) You can mention from where the responsibility should be available
8) Select the data group as standard from the LOV.
A data group is a list of Oracle Applications and the ORACLE usernames assigned to each application.
9) Attach the Menu for the responsibility.
10) Attach the Request group to the responsibility.
11) You can also exclude the form function to be shown in the responsibility from the attached Menu. This need to be entered from menu Exclusion Tab.
12) Click on Save.
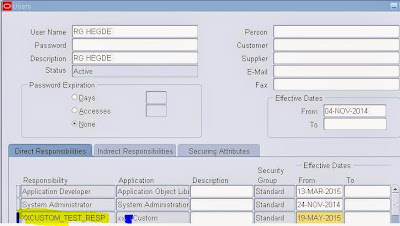
13) Once the Responsibility is created then that responsibility need to be added to users to access.
14) Open the user window. Query for the user to whom the responsibility need to be added.
15) Select the responsibility from the LOV .
16) Click on Save.
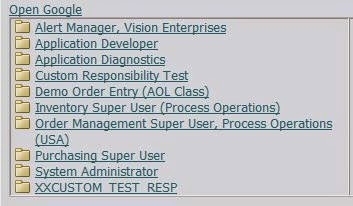
17) The responsibility will be shown once the user is logged into the application.
The table fnd_responsibility has the responsibility information. You need to query with the responsibility_key. From the responsibility id you can trace other information relating to the responsibility.
The table fnd_responsibility_tl contains information about responsibility name and language information.
The View fnd_responsibility_vl has all the information about the responsibility.
Using below Query you can get all the responsibilities assigned to a user.
Request Set is the collection of concurrent programs which executes in sequential/parallel manner which you have defined from a single transaction. Request Sets also has run and/or print options which apply to every concurrent program defined. The programs in the request set can share the parameters, Hence Parameter values need to be entered only once for multiple programs.
Request group is a collection of reports or concurrent programs. It may be individual concurrent program or Request Sets. Request groups are normally associated with Responsibility. Request Groups can be used to implement the security at responsibility level.
Request Set Creation:
1) Go to System Administrator Responsibility=>Requests=>Set
Request Set window will be opened.
2) Enter the Set name.
3) Enter the set code.
4) Select the application from the LOV.
5) Enter the description about the Request Set.
6) You can select the owner of that request set. This is optional.
7) You can mention the active Dates and select the Run Options.
8) Either you can go for Request Set Wizard or manually define the stages.
9) Click on Define Stages.
10) Define the sequence of the stage.
11) Enter the Stage name and stage code.
12) Click on Requests button.
13) Enter the sequence and select the program name. Here you can define multiple programs or single program.
14) You can manage the Parameters from Request Parameter window.
15) You can manage the stages from Link stage window.
Request Group Creation:
1) Go to System Administrator Responsibility =>Security=>Responsibility =>Requests.
Request Groups window will be opened.
1) Enter the Request Group Name.
2) Select the Application from the LOV.
3) Code is the optional field.
4) Enter the description for that Request group.
5) Go to the detail block.
6) Select the Type as program /Set.
7) Select the concurrent program name/Request Set name from the LOV.
8) Click on Save.
9) For verification open the request group window =>Press F11=>Enter the Request Group Name =>ctrl+F11.
10) You can also check the request group information from back end.
The table fnd_request_groups provides the header information of request group.
The Table FND_REQUEST_GROUP_UNITS provides the concurrent program details which are attached to the request group.
How to Run Request Sets:
As discussed the request group is associated with the Responsibility. Find the Responsibility to which the request group is attached.
1) Go to System Administrator => Responsibility=> Define
2) Press F11 and enter the Request Group name and press ctrl+F11.
3) It will show the responsibility where this Request Group has been attached.
4) Login to that responsibility Go to View menu=>Requests
5) Click on Submit New Request button
6) By Default Single request will be selected. Change that to Request Set and click on OK.
7) Select the request set name from the LOV . It will show all the concurrent programs defined in that set. Select the Parameter and click on Submit.
You can follow the below steps to create menu in Oracle Apps
1) Go to Application Developer/System Administrator Responsibility=>Application=>Menu
Menu window will be opened
2) Enter the Menu field.
3) Enter the user Menu Name. This name will be displayed at front end.
4) Menu Type is optional field.
5) Enter the description.
6) Go to detail block to attach the form function/submenu.
7) Enter the sequence number.
8) Enter the prompt . This is the name which shows at front end for the form/submenu.
9) Go to function field and select which form function you need to attach to the menu from the LOV.
10) You can also select/attach the submenu to your menu. Submenu is also a menu which may have list of form functions and submenus.
11) Click on save.
12) It will submit a request to recompile the menu in the database.
13) For confirmation Open menu press F11 . Enter the menu name and press ctrl+F11.
14) You can check the menu details from the database
FND_MENUS displays the menu information . Using the menu_id you can trace from other menu related tables.
FND_MENUS_TL displays user menu name information and language
Form Function and submenu information are available in FND_MENU_ENTRIES table. Using SUB_MENU_ID and FUNCTION_ID you can trace it further.
To access oracle application user name and password is required . You can follow the below steps to create user in oracle Apps.
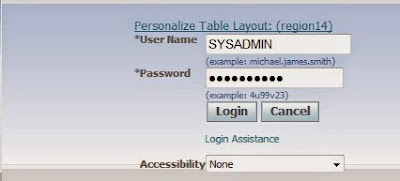
Login to Oracle Application with SYSADMIN user or Any other user who has System Administrator responsibility assigned to the user.
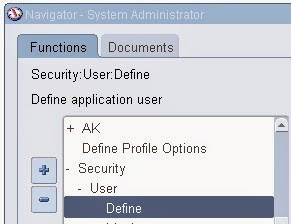
Go to System Administrator=>Security=>user=>Define.
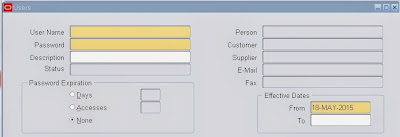
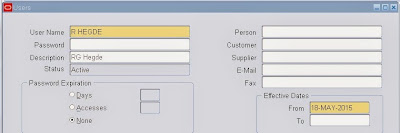
User window will be opened:
1) Enter the user name
2) Enter the password (The password will be disappeared once you enter the password)
3) Re-enter the password ( The password will be disappeared and field color become white)
4) Enter the Description (this is the full name of the user)
5) If the user is an employee and if it is created you need to select from the LOV in field Person.
6) Enter the Email address
7) If the password Expiration required you can select from the radio button.
8) You can mention the effective date of that user in From and To dates
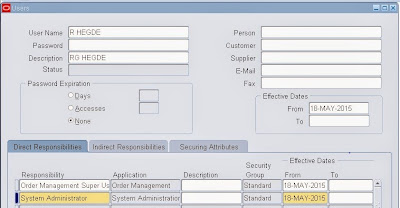
9) Switch to the line level to assign the responsibility to the user.
10) Select the List of responsibility from the List Of Values of the field ‘Responsibility’
11) You can also mention the Effective date for that responsibility
12) Click on save.
13) To confirm user creation Open the user form Press F11. Enter the user name in the field User Name and Press ctrl+F11. The form will display the user information.
14) You can also check from back end about user creation by using below query.
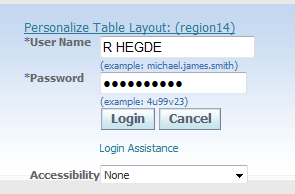
15)Login to the application with your user name and password
16) It will ask to change the password at first time login
Enter the old password and enter the new password
17) Then It will show all the responsibilities which are assigned to the user.